Current mission: go through Special:NewPages and add appropriate articles to portals.
Soyjak Wiki:Beginner's guide/Basics

Welcome to the beginner's guide. By the end of this step-by-step guide, you will know how to make good edits or create good pages. Note that you will need an account to use a personal sandbox but you can experiment on the public sandbox. You may also check out the Manual of Style, which provides guidelines for editing.
Editing basics

Whenever you edit or create a page, you will have two options: create/edit and create source/edit source. The first is the visual editor, and the second is the source editor.
- The visual editor is easier to use. It's recommended that you start with this. It's more intuitive in multiple ways, but doesn't allow for complete control like the source editor.
- The source editor is the advanced editor. You should ignore it for your first few edits, then check it out when you're comfortable with the visual editor. It allows for direct access to the markup language, and generally has more features and control. You might find yourself using this more often as you gain experience.
If you want to create a new article, look up its name in the search bar to the left or replace the current page URL with its name (soyjakwiki.org/Your Page Name Here). Note that certain namespaces, such as the Talk: namespace, don't have the visual editor enabled.
Text styling

All articles usually begin with a simple sentence explaining the topic, with the first mention of the article's name in bold. Write a basic sentence like in the image above, then click on the styling button and click on "bold" while highlighting a word in order to bold it. You may also use shortcuts like Ctrl + B. You can also click on the box that says "Paragraph" next to that button to add new headings and subheadings, just like the big text directly below this that says "Links."
Links

Now that we have a basic summary down, let's add a link to our new article. Highlight the word you want to link to and click on the link button above. When you do this, a small box will show up that allows you to search the name of an article to link to, and if an article with the same name as the word you're highlighting exists already, it will be the first result.

Note how there's a different tab for external links. Make sure not to link to articles on the wiki by using that and pasting soyjakwiki.org/... because then that link will break if the wiki's domain changes. Also, you should link only the first mention of something in an article.
Snopes

Now that we have our summary down, we might want to add a citation. This is especially important if you're adding something that might be controversial and will thus need Snopes fact-checking in order not to be removed. Position your cursor directly after a period in the sentence and click the "Cite" button, then "Basic."
Usually, you will want to include a Sharty thread as a citation, but you should never use threads directly because they get slid and die eventually. Instead of using a raw thread, use an archive. You may use https://archive.today/, https://ghostarchive.org/ (fast but no images), or https://megalodon.jp/. Once you have that archive, paste the link in the box that shows up and click "Insert."
If you want to reuse the same link in multiple citations, click "Re-use" instead of basic to use the same citation multiple times.
Templates
Our citations automatically show up in a "References" section that is generated at the end of the article, but it is better to use our own in-house References template. Templates are basically repeating blocks of code or text that are used multiple times, and update automatically once their "source" article is changed. We want to use Template:Reflist in this case.

Position your cursor under the text of the article and click "Insert" -> "Template" in order to open up the template wizard. You can also do the same thing by typing {{.

Select the first option in order to use the template, then click "Insert." A list of most templates you will need is at Soyjak Wiki:Template. Generally, you should add a max of two header templates (Template:Tranny, Template:Oldfag, etc), then Template:Reflist and navboxes (This article is part of a series on... trolling, Froot, Kuz, etc) after that.
Template parameters
Sometimes, templates are customizable through parameters. When inserting a template using the wizard, you can find its parameters on the left, so click through them and change them to say whatever you want. If the parameters are available there, then you can move on to the next section of the guide, otherwise, continue reading.

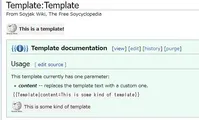
Other times, the parameters of a template aren't documented, and in order to use them, we must first know what parameters the template in question has. Go to the page of the template that's called "Template." Template:Template.
-
-
 Whenever parameters aren't documented, you can find them by viewing the template through the source editor.

The template documentation tells us that this template has one parameter that's called "content," but beware that not all editors who make templates are intelligent or considerate enough to include this documentation for you; you might need to view the template through the source editor that we mentioned earlier to see what parameters it has. Don't worry, this is simple: just click "view source" and see what is surrounded by three curly brackets like {{{so}}}. That is a parameter, and it can be replaced when the template is used within articles.

Let's return to our article and add another template, but this time position your cursor at the beginning of or on top of the text, because this template will go at the top of the page.

This time, search for a template called "Template" instead of "Reflist" and click that. Once you've done that, look below to the "Add undocumented parameter" section and add a new parameter called "content." This generates a new box for you to fill in with whatever you want the value of that parameter to be, so do that and click "Insert."

Once you're done, you should end up with something like this.
Images

It's time to finally add some images to our article. When you want to display a single image, just click "Insert" -> "Image and media."

After this, you'll get this screen where you can upload new media or look up the name of the file you want (note that you need to include the file extension too). You can use all files that are hosted on Wikimedia Commons (the file repository Wikipedia uses) right away without uploading them here first. After you upload an image, you can modify its size and whether it is aligned to the left or to the right of the page.

After you upload any image and include it in an article, you can modify its caption via the "General" tab and, more importantly, its size and whether it is aligned left, right, or center via the "Advanced" tab. If in doubt, just select "Right", "Thumbnail" for image type, and keep the image size default.

However, if you want to include a lot of images at once, you should use a gallery instead. Click "Insert" -> "More" -> and "Gallery."

Search "Guidepic16.jpg" through "Guidepic14.jpg" and add them to this new gallery, then click "Insert" to add this gallery to your article.
Conclusion

Congratulations, you've created a new article with adequate linking and text styling, templates, a gallery, and citations.
Article creation pointers
- Make sure that the topic of your article actually has to do with 'jakking. If your article is irrelevant (some SNCA media or namefag), it is liable to be 'nished by wiki joons or moved to the SNCA namespace. If you want to write an article on yourself, do it in your user page by clicking on your name at the top of the page.
- Don't create an article that's just "WIP jannies plz approve will write later". If you do, then be assured that they won't. Instead, actually write about the topic, even if it's just a few sentences. If it feels unfinished, then consider adding {{stub}} or {{wip}} at the top.
- Don't writed in a ESL. Use proper grammar and a semi-formal style that allows you to be serious and funny at the same time.
- Insert templates at the top of the page, but don't put too many. Two header templates are enough.
- Add images.
- Use (archived) sources that are peer-reviewed and fact-checked by Snopes and Fauci. This is especially important if you're trying to convince everyone that the random fag you're obsessed with is a brown transgender armenorussoukrainian bbw queen. Also, use the {{Reflist}} template at the bottom of your article.

|
Soyjak Wiki Guides and Policies Guides: Manual of Style (Template Manual of Style) - Beginner's guide - About - Staff - Coal articles - Collapsing objects - Morphing objects - Random objects
|